So it’s been about three years since my last post. Life has taken a few turns since then and has gotten really busy. I decided to take a break from posting when covid hit because I was taking Thumper’s advice. The internet was so hot with too many opinions, but I haven’t forgotten my blog. I hope to start adding more posts soon, but at least you know I’m not dead. I have just been doing other interests. ❤️
So you have made the crazy choice to add a puppy to your household! Congrats! But what about potty training? Where is the puppy going to go potty? How are you going to handle messes? That is the hardest part of having a puppy. Some might say it’s the crying or the chewing but actually I say it is the potty training. Whether you live an apartment or a house, a puppy litter box is a good thing to have.
There are many reasons why use a litter box over puppy pads. For one thing puppy pads a very expensive since they have to be purchased again and again. the benefit of making a litter box is reusable especially if you use sod as the inside bedding for it. This is the type of litter box we made for our puppy, and it works wonderfully.
Why use a litter box at all? Can’t you just take your puppy outside? Well, until your puppy is fully vaccinated it is not wise to take it out to the common area (i.e. dog parks, apartment dog areas, parks, parking lots…) so taking your puppy out potty isn’t all that safe due to parvo and other puppy diseases that will be taken care later with his vaccines, but for now those kind of germs are very dangerous to your young puppy. That is why a litter box, especially if you live in an apartment or condo. With that being said, let’s get to making the actual litter box.
First, you need a few things.
A kiddie pool
Sod
That is it. I ended up using two layers of sod but you can make it as thick as you want it. All you do is cut the sod to fit the size of the pool and your puppy is ready to use his new litter box. There is one thing that is a special note is that I didn’t put any holes in the bottom of the pool. I did this because I wanted to be able to bring it into the house if needed and holes would make that a messy affair.
So you might be wondering what kind of maintenance dose a puppy litter box need? Since the litter box is made out sod you will have to water it. For this I use a water can and water the sod once a day. You will also have to give the sod plant food since the ammonia in the grass will try to kill it. And since the grass will grow you will have to trim every once in awhile. Otherwise it is pretty easy to maintain.
As for cleaning the watering does two things. Not only does it keep the grass alive, but it also cleans the grass. The one thing that dogs need is a new place to mark their territory and if the whole area is marked then they will less likely to use the litter box. So if you water the grass it will clean it. Not only does it keep the grass alive, it keeps the space new fo the puppy to mark, but it will also help with the smell. So all this to say to make sure you water the grass. And it goes without saying, especially if you are in an apartment, make sure to clean up the poop. I don’t think that needs to have much explanation.
I hope this has been helpful to take care of one stressful thing of bringing a new puppy home. Because potty training is stressful enough and I hope this will make things easier. Have fun with the new puppy!!!
If you are like me you are all into Harry Potter, but you grew up in the 90s so you were bombarded with Disney Princesses. I personally grew up singing every single song and I can still to this day rock Disney karaoke on the drop of the hat. I spent my teenage years looking for my Prince Charming and cried at all the happy endings. But now I am an adult. So do I have to stop believing in magic? Heck no! Because I have been introduced to Hogwarts and all things Harry Potter and I am screaming “Oh Harry! Where have you been all my life!” (British accent poorly but appropriately inflected).
Since I am now a Potterhead, I of course got sorted on https://www.pottermore.com/ and I am a proud Ravenclaw! My husband was then sorted as a very accurate Hufflepuff and my daughter is too young to be sorted but we strongly agree she will probably end up in Ravenclaw or possibly Slytherin. I hope Ravenclaw since I am not a big fan of the color green but LOVE blue with a touch of yellow. Any way, it got me thinking about mixing the two classics… Could I still be a Disney princess fan while supporting fellow Ravenclaws? then I saw this shirt (comes in a hoodie too) and it explained me perfectly. (And no I make no money if you buy it off this link.)
Shirt says “I am a Disney Princess at Hogwarts I’ll Stupefy you and the bust into an inspirational song”
But now I am getting off track. My next thought I was thinking was which houses would the Disney princesses be sorted into if they attended Hogwarts? So I did some soul searching and here is the list I came up with and the reasons but first let’s have a review on the traits from each house. I got these from The Odyssey.
Gryffindor: The house of the brave, loyal, courageous, adventurous, daring and chivalrous. Those who stand up for others are typically Gryffindors. Brave-hearted is the most well-known Gryffindor characteristic, and Gryffindors are also known for having a lot of nerve. “Do what is right” is the motto Gryffindors go by.
Ravenclaw: The house is known for their wisdom, intelligence, creativity, cleverness and knowledge. Those who value brains over brawn can be found here. Ravenclaws often tend to be quite quirky as well. “Do what is wise” is the motto they strive to follow. Though Ravenclaws can be know-it-alls sometimes, they most likely do know what the wisest decision is.
Hufflepuff: This house values hard work, dedication, fair play, patience, and loyalty. Hufflepuff’s are known for being just and true. “Do what is nice” is their motto. Hufflepuff is known as the “nice house” and believes strongly in sparing peoples feelings and being kind. This is not to say that Hufflepuffs aren’t smart or courageous. Hufflepuffs just enjoy making others happy and tend to be more patient towards people.
Slytherin: This is the house of the cunning, prideful, resourceful, ambitious, intelligent, and determined. Slytherin’s love to be in charge and crave leadership. “Do what is necessary” is the motto of this house.
Ok, now that we have this to go by, let’s take a look at how I think the Disney Princesses would have been sorted if they ever had the chance to attend Hogwarts and say “see ya” to their love struck princes.
Ariel
Although she is my favorite princess since I love being a mermaid and I even became one (check out This Post to see how), she is a Slytherin. OMG! What? First on the list and it’s a Slytherin? I know, but hear me out. Look back at the list and then think about Ariel’s motivation for the entire movie. I’ll wait. Now do you see it? Her motivation was completely selfish! She was cunning and resourceful for what she wanted by going to Ursula. She was also ambitious in becoming human, intelligent on how to get the prince to fall for her even though she had no voice, and determined to have no one stop her from getting her happy ending. She is a whole class Slytherin and I think the house would have been proud to have her join them at their table.
Rapunzel
I am guessing you are figuring out the clue I am giving to let you know which house I think the princess in question is sorted in? Good. That was the point. I am having my Ravenclaw show a little LOL. But yes Rapunzel is also a Ravenclaw because she is very smart. She knows what she wants but she is smart on how to get it. She problem solves, and is very out spoken in her adventures with Eugene. Even though some might say she is Slytherin I disagree and say she is Ravenclaw so to the fact she is also very creative and wise as she helps the bandits remember their dreams and later to figure out the puzzle of her royal heritage. So good job girl and welcome to the Ravenclaw house!
Snow White
Sorry dear Hufflepuffs but the yellow would not show up so the lettering is an orange/yellow color. But I think there is no argument when I say Snow White a true Hufflepuff. The truest of them all. She is kind and loyal to her friends even if she is a little light in the head, she still sees the good in people and just wants everyone to get along.
Jasmin
I had a tough time figuring Jasmin out at first since she is honestly a little of each house, but I finally settled on Gryffindor because she ultimately wants to do what is right. She believes in justice and changing things that are hurting those around her. she isn’t scared to state her opinion but to go a step further and take action by getting on a flying carpet and flying around the world with a complete stranger. So props Jasmin for making it into the Gryffindor house!
Merida
Merida to me was an easy pick. With her hot head and red hair, Gryffindor seemed natural, but it was her spirit for adventure and doing the right thing that actually won her the spot at the Gryffindor table. Hopefully she will keep her cool and not turn anyone into any more bears or ferrets now that she has a wand beside her bow and arrows.
Aurora
“I know you! I walked with you once all the way to the Hufflepuff table!” Oh wait, that’s not how the song goes. Oh well it should since she definitely is one. With her tender heart and big dreams, Aurora joins Snow White as the newest members at the Hufflepuff table.
Belle
Need I really say it? She loves books and knowledge! That’s a huge sign that someone is a Ravenclaw! But not only that she showed great cleverness in getting her father released by taking his place and the wisdom to see the Beast’s heart passed his appearance. She spoke up to him and wasn’t taken back by his temper to be able to stand up for herself. She is a clever and smart lass and deserves to be at the Ravenclaw table who will later be seen in the library reading.
Pocahontas
Now I have my own buff with Disney on the way they made this movie she is my great, great, grrrreeeaattt aunt. I am actually related to her sister. Any way, she earns a spot at the Slytherin table. I know. My own family member! A Slytherin! But the way that Disney made her look it was fitting. See, she might have said in her head “I’ll hang out with John Smith and our worlds will learn from each other”. Ok, good idea that almost earned her a spot at Ravenclaw, but when that plan failed and she wouldn’t back down from seeing John Smith behind her father’s back made it so she lost her wisdom seat. Instead she then showed that she was willing to do anything to get what she wanted even if it meant almost getting her and her love killed. And in the end she lost it all anyway. Good job, Auntie.
Mulan
Do I really need to explain this one? She did what any respectable child would have done to protect her father. She was brave, loyal and courageous. Welcome to Gryffindor!
Anna
I actually had the hardest time sorting this one. Started giving me a headache. Ok, I had to through in a Sorting Hat joke. But it was Anna’s desire to have everyone together and getting along that showed me she deserved to be a Hufflepuff. She is loyal and kind and loves to be around people. The Hufflepuffs couldn’t have gotten a more perfect addition to their table.
Elsa
Yup. You see the right color on Elsa’s name. Now I know you were probably thinking Gryffindor but let me explain, Yes, Elsa tried to do the right thing by hiding her magic, but was it really the right thing? Or was it her being prideful and letting her fear of failure control her? She does have a big heart but it almost cost her everything since her lack of letting anyone help her almost killed the one person who believed in her the most. Get a walking Elsa. You are a Slytherin.
Tiana
Now this is the one princess I don’t know the most about since I saw her movie one time and it scared me and a friend so badly we kept every light on in the house until morning. But from what I remember is that she is super smart in her desire to be a restaurant owner. She is determined and witty, but she has a downfall in dealing with a voodoo master guy who turns her and a prince into a frog. Or something like that. Either way she gets turned into a frog and then has to use her skills and brain to get herself turned back into a human. So for those reasons she better getting studying for those exams because she is a Ravenclaw.
Moana
Another one is lost to the Slytherin table… Ok not really lost but Slytherin and Ravenclaws don’t usually get along so I see it as a loss. Once again you might have thought Gryffindor since she was brave to venture out on her own to save her island. But let me remind you the original reason Moana wanted to get on a boat and it wasn’t to really help her people. It just happened to work out that what she wanted turned out to be what the island needed and she did what she had to then to save it. Time to wave on down to the Slytherins, Moana. Maybe you can teach them to sail?
Cinderella
And lastly there is the sweet Cinderella. There is only one house that this princess falls into really. If she was a Slytherin she would have figured out a way to make her step family pay to gain control of the estate, if she was Gryffindor she would have just told them to pound sand and tell them to leave, and if she was a Ravenclaw she would have been smart enough to think of plan to remove herself from the situation. Also if you talk to mice there is really only one house for you. Hufflepuffs! Get ready to have more animal friends in your presence!
So there you have it. My list of how the Disney princesses would be sorted if they attended Hogwarts. Do you agree? Do you not? I would love to hear your respectful comments down below and remember, constant vigilance!
Ho! Ho! Ho! Tis the season for Christmas trees, lights and Santa Clause! I love Christmas. You can ask my husband, so I naturally love wearing Santa hats. The only problem I have found is that they don’t always fit and I am not thrilled with the options for colors and prints. So I said heck with it and decided to make my own. Here are the step by step instructions.
Things you will need:
Fabric of your choice
Thread to match
Fleece or Flannel for brim in color of your choice
Stuffing of some kind (polyester of even scraps)
Scissors
Needle
Sewing machine
Step One: Make the Pattern
If you are super crafty and know how to make a pattern by measuring your head, go for it. I do not know how to do that so I just used a Santa hat that fit me ok to trace for my pattern. Heads up – I am sort of a Potter fan so I wanted to make a Harry Potter Santa hat. Ergo the reason for this whole post. So the fabric you choose can be traditional or you can say heck with it and make a Santa hat that fits your style like me.
To make the pattern tape some printer paper together and lay your hat on it.
Now trace around the hat up to the pom pom. If the hat you are using is a little small on you then set your trace a little wider around the hat to give you extra room. Then cut a piece for the brim of the hat by measuring the thickness on your pattern making hat with an over hang of about a half an inch on each side of the hat. Finally, make a circle cut out for the pom pom. You can make this whatever size you want. I like littler pom poms so mine might be smaller than yours if you like big pom poms.
So your final cut outs should something like this.
Step Two: Cut it Out
Next it is time to cut out your fabric. Lay the hat part of the pattern on your fabric and (using pins to keep it from moving) cut around the pattern. Make 2.
Now do the same for the brim. Make 2.
Then cut out the circle for the pom pom to make your final cut outs of your fabric look like this.
I’m a mom and my daughter wanted to supervise me while I made this. That’s the reason for the random water bottle in the background. #momlife
Step Three: Next it’s time to sew! 🙂
I started with the fabric for my brim, and the fleece I chose sheds so I ended up doing a rolled hem to keep it from snowing all over me as I wear the hat.
I then had to add it to my hat so I pinned wrong side of the hat and the right side of the brim together a sewed it, so when I turned it over, the seam would be hidden and you get that nice hemmed look at the edge of the hat.
After you have sewn those together flip the brim up and sew it against the hat to keep it in place. Now that I think of it, you can also have hemmed it at this point instead of earlier in the process.
Once you have sewn both brims onto their appropriate sides, put the right sides of the hat together, pin, and sew leaving the bottom open of course since this is a hat and it has to fit on you head.
Step Four: Make the Pom Pom
Now that you have something that is actually looking like a hat, it is now time to make the iconic pom pom. Take the circle you cut out, tread and needle, and enough of something fluffy to stuff it.
How I made a casing for the stuffing was by doing a loose stitch and weaving it on the inside of the what will be the pom pom.
Then I stuffed it and sewed it onto the tip of my hat.
Step Five: Show it off!!!!
Yay! You have now made your own one of a kind Santa hat!
Wear it where ever you want and show it off! You deserve it. And you will be the life of the party since everyone else will have a generic hat while you will strut in and go “see how awesome this looks? Where did I get it? Honey, I made this”. I hope you have a Merry Christmas and a Happy New Year.
If you are like me you have a dog… or maybe more than one dog or cats. We have this adorable Corgi. Isn’t she cute? You can’t help but come home after a long day and smile at that cute face and tantalizing ears.
There’s just one thing that she does that is hard to get use to. She sheds! Every where! I did my best to vacuum and keep the fur under control, but I quickly realized that wasn’t going to be easy with just vacuuming. I had to pull it out of the source. So I started looking for the best de-shedding tool. I have personally bought and used these tools. No company paid me for a review.
I first tried a simple wire brush like this one.
This is definitely the cheapest option but I found it not that great. It would scratch my dog and when I went to pull the fur out of the bristles I would poke my fingers. The worst part is that it wouldn’t get the under coat where most of her shedding came from. So it was on to something else.
The next thing I tried was taking the plunge and buying a Furminator.
I really like this brush and it does a great job of getting not just the top coat but also the under coat. I had two Corgis after using this thing so much fur came out. So this is a great option and I enjoy using it. You can get your own here if you want BUY HERE but I just bought mine at Pet Smart. It is very easy to use, doesn’t hurt your hand, and is super easy to clean. I give this tool 5 out of 5 stars for sure.
But there is one more that I want to share with you. Although the Furminator is a great tool, and I will keep using it, there is a new tool I was introduced to and that would the Pet Ninja gloves.
I LOVED these because it was more like giving my dog a rub down instead of a brush down. She didn’t want me to stop whereas within five minutes, even the Furminator, she is pretty done. These gloves were just like me petting her and they are very comfortable to wear. If you want a tool that is more bonding I would highly suggest these. And they are not all that expensive. they are cheaper than the Furminator and can work on all fur types from what I can tell.
So there are the three de-shedding tools I have used. Remember that every dog and cat is different so these might work great or they might not work at all. You just won’t know unless you try.
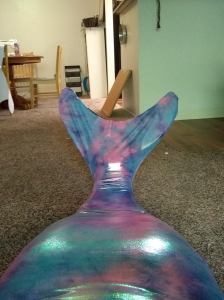
Do you love mermaids? Well, I love mermaids. I have dreamt of being a mermaid since I can remember. I mean my favorite Disney princess is Ariel and I have been able to sing her key note song since I could a hold note. So now that I am an adult I decided to make my dream a reality. Here is my step by step method I used to make my mermaid tail.
Step 1: Pick the Fabric
I used a performance fabric from the fabric store. There is something very important to check when buying your fabric though. Make sure you can stretch it FOUR ways and that it won’t pill (run) when you do. There is some performance fabric that really lack performance (pun fully intended). You can choose a pattern, shimmery or even one with mermaid scales. This is the best part really because you get to make your tail special and one of a kind just like you! As for how much, I am 5’4” and needed 2.5 yards. I ended up buying 3 yards to be safe and had enough to make some swimming leggings to wear this winter. So when in doubt buy more 🙂
Step 2: Make the Pattern
This was the hardest part and you will need an extra pair of hands. Get some paper, tape it together and lie down. Have your helper then trace your lower body (keeping your legs as tight together as possible) with the pen right next to you so that you have a silhouette of your body. Have them stop at the ankles since you will be putting the trace out of the mono fin there.
Side note: It is vital to buy a good mono fin. I bought mine at Fin Fun and I love it. It worth the money to buy a sturdy mono fin that is made to be a mermaid. (I am not sponsored by the way. I just love their products.)
Next it is time to trace out the mono fin pattern. Lay the mono fin on some paper and trace it out just like you did for your body. Attach it to where your ankles are. You will have a clearer view in the next step.
Step 3: Cut the Fabric
Fold your fabric together right sides facing each other and pin the pattern on top of it to make it so the fabric won’t move while you cut and your pattern will not move either. Make sure for a child you give a one inch allowance and two inches for an adult.
Once you have cut the fabric you can remove the extra fabric and you will see this. It may not be a perfect two inch allowance but it is pretty close.
Step 4: Pin the Fabric
Now that you have cut the fabric out, but before you remove the pattern, pin the two pieces of fabric together all the way around except for the very bottom. I left it open so I can slide the mono fin in and out that way. This is how Fin Fun does their mermaid tails so if you would prefer to just buy a beautiful mermaid tail CLICK HERE. So this was not my idea but rather the genius of Fin Fun.
Step 5: Sew the Tail
Now sew around the tail giving an half inch seam allowance for kids and one inch allowance for adults. Leave about an inch and half at the top open so you can make the casing for the waist band next.
Side tip: One big thing to know about using a stretchy material, you need to use an all purpose thread and ballpoint needle. When it comes to stitch choice you have two options. You can use the zig zag stitch because it will give some give to the fabric and allow the fabric to stretch slightly as you take it on and off. The other option is the straight stitch. The tip for a straight stitch though is that you have to put some pull on the fabric to stretch it out as it goes through the machine. If you don’t you will break the thread as you use the mermaid tail. I like the straight stitch so I used it, but I did have an issue with the thread missing the bobbin so if yours does no worries. Just go over it again and the seam will be secure.
Step 6: Make the Waist Band
Now you have to make the casing for the waist band. I used one inch no roll elastic. Measure it around yourself where the waist of the tail will be. Make to it so it will be snug but not too tight.
Next fold over the spare fabric from the last step and pin the casing. Sew the casing with which ever technique you choose. Now use a safety pin to act as a needle to pull the elastic through the casing. Sew the elastic end pieces together and then the sides of the casing together.
Side note: I like to round off my elastic ends so it will make threading though the casing easier.
Step 7: Try the Tail out
Turn the tail right side out and admire your handy work. you have just made your first mermaid tail! Congrats! Now try it out. Slip the mono fin in and make sure the tail is the right size. This is not the most flattering picture on the planet but it was the first moment of me being a mermaid.
Step 8: SWIM!!!!!
Now that your tail is complete time to get in the pool! I love how fun it is to live my dream of being a mermaid and I hope you will too. To make sure you are ready to be a mermaid, here is a video from Fin Fun with all the skills you need to make sure you are ready to be a mermaid CLICK HERE. Happy Mermaiding!
Do you have PCOS? Do you have pregnancy symptoms but aren’t pregnant? Well I am here to tell you that you are not alone. I am a woman with PCOS and have these “episodes” too. My OBGYN thinks I’m crazy, my family thinks I’m crazy and even I was thinking I am crazy. And feeling very alone.
It all started for me when my husband and I were trying to conceive our first child. I was so happy since I was feeling pregnant our first month of trying. I waited two weeks and peed on a stick. Only I saw a big ol’ minus sign on the test. Devastated, I waited for my period but it didn’t come for another week and I thought I was going to die. The bleeding was horrendously heavy, the cramping were unbearable, and the clotting was alarming. It lasted for almost two weeks and then finally it was over. I thought for sure it was a miscarriage and according to my Google searches it was.
This happened five more times in a year and each time I was becoming more depressed and honestly and little neurotic. I tried working with my OBGYN, who is really awesome by the way, with blood tests, ultrasounds and any other test she could think of but all told me no matter how much I wanted to be I wasn’t pregnant.
So what did I do? I thought that if it was pregnancy that if my husband got a vasectomy these episodes would stop. Simple right? Well my husband was done trying for another baby since it was ruining me, our marriage and our lives so he went through with the vasectomy. For a little bit it seemed to work and then it happened again. I had my husband give a sample and it was clean. No sperm anywhere. So now I knew I was crazy and the vasectomy didn’t stop anything.
Depressing? Well I was pretty depressed. What was I going to do? Well, I am sorry to say that there isn’t any western medicine that can help us yet. I have tried and there isn’t a single answer there that will actually help. What I can tell you is that you are not alone and you are not crazy. I don’t know what causes these episodes other than it’s hormone related and of course PCOS does a great job of messing with them. But I can assure you that you are not crazy and you are not broken. There are more women out there like you and we stand in support. There are alternative things you can try but those you will have to do some digging with.
You are precious and you are strong. Keep searching for answers because someday some great woman is going to find a full answer that will change everything for everyone. So keep heart and keep your head up.
Have you ever been in a small group and you are telling each other your testimony, and it’s your turn? You have heard some amazing stories of rag to God’s riches and you think “I can’t tell my testimony because my testimony isn’t good enough”? Are you the Christian who has been in church since you were a kid and have stayed with the faith and not strayed to the right or the left? Or if you did, it still isn’t that “impressive”? Yeah, I’m right there with you.
I was recently in a small group and I felt it more than ever. the woman who shared has an amazing testimony of restoration and redemption from where she was to where she is. I was actually jealous of her testimony and now was dreading it to when I was picked to speak. But then I thought why? Why am I embarrassed to tell my testimony just because it isn’t flashy? Maybe it is because I have never seen a testimony given at a church from a person who has been the kid who grew up in church. All you ever see are the testimonies from people who have these flashy stories of how low they were until they found Jesus and now look how great their lives are because they found Jesus. Don’t believe me? Think about every public testimony. What do they all in common?
So why aren’t there more testimonies showcasing people who have grown up in church and are still in church? Those who grew up in youth group and now they are the leaders in that same group? To me that sounds like the only way your testimony is important is based on how “bad” someone was before they were saved. That isn’t right. No one should be embarrassed to tell their testimony, but that is the culture we have been brought up in. Only those who have Saul to Paul stories get the spot light and those of us who have been Stephens are the ones trusted in the ministries. Not saying that isn’t where a true servant’s heart is, but just once I would love to see a testimony where the person grew up in church and stayed on the straight and narrow. That would be a great testimony along with the “fancy” ones.
We had something kind of funny happen to us. We were remolding our kitchen and it was time for the hole for the sink in the counter top to happen. All was going well until the guys realized the hole was too big. We tried to fix it with just buying a bigger sink, but the hole was too big in a way we couldn’t find one. So we had to buy another counter. No big deal. It was just a trip to Lowe’s. The part that was interesting was the fact the guy helping us was not able to stay and try to cut the hole again and he wasn’t sure when he could come back. Guess what that meant. Yup, no sink in my kitchen.
It was interesting, but it helped me grasp a new appreciation for the running water in my house. All the time we heard about these countries who don’t have clean drinking water. The speakers will usually show a video of some poor kids with sad faces, we give money towards the cause and then go home and take a long hot shower or something with water. We have little idea just how important water is to people here in America because we have it literally on tap whenever we want it.
What if we didn’t? Now, I had water in other places in my house so I wasn’t completely without water, but I had lost for three days my main water source. I had to get really creative in order to do food and clean up without a kitchen sink. I bought two five gallon buckets to wash dishes in and was going to have to fill them up by the patio hose since it would be “too hard” to do it in the shower or another faucet. I was all prepared to do it Little House on the Prairie style, but there was something we have in America that those who don’t have water don’t have. My husband and I decided to just buy two Costco pizzas and a pack of paper plates. It got us through and we were tried of pizza by the done it was all done.
But what is my point? The point is that you can’t appreciate something really until you don’t have it anymore. I just got a taste of what it’s like… Okay more like a nibble of what’s like for people all over the world who don’t have running water in there house. Heck for those don’t have clean drinking water. At least all my water was drinkable and we had our fridge to get our filtered drinking water from. So many people don’t have anything, and it humbled my heart to actually put myself in their shoes.
Now I am not saying shut all your water off just because not everyone in the world has it, but I am saying to really be thankful you can turn a knob and clean drinkable water comes out. I know I do now and I wasn’t as grateful for it before. I expected it to be there, but, after this experience, I know now to always be thankful for it because in the blink of an eye it could be gone.
I know the thought of being a one car family might be down right frightening to some families. How is it going to work with the schedule? How are the kids going to get to where they need to go? I’ll have to be at home more! And the mental thoughts go one. Also, I will say this disclaimer: Being a one car family doesn’t work for everyone. Just want to be clear about that. Not everyone can make a one car thing work because of their work schedules or work locations. But if you are able to make it work, there are a lot of benefits to having only one car. Let me explain.
Back in 2016 my husband’s car was dying. It was needing a repair done that was far more expensive than the car was worth. now what? Do we buy another car? We really didn’t have the money for one saved up since we like to own our cars outright. So we made the decision to not replace the car. Instead my husband rode a bike to work since at the time we only live a couple miles away.
Fast forward to the summer of 2016 and disaster hit our family. You can read more about that in my post Empathy for Single Parents and it explains that we lost everything in our home to black mold and my husband and I had to live in separate locations because we only had one car. We then made the choice to go ahead and get a car loan on a used car since we wanted to be able to see each other more, but then our current car’s A/C went out which left us with a car payment and one car again. So I kept the car at my parent’s house with my young daughter and my husband stayed with a co-worker and got to and from work that way. This was the down side to only having one car for sure, but we made it through.
We bought a house that summer that was only 6ish miles from my husband’s work and I regularly drive my husband to work and pick him up in order to make this one car thing work for us. I have been a stay at home mom so I haven’t had a work schedule to deal with and is one of the reasons we have been able to live with only one car for a little over two years at the time this post was written. We do plan on buying another car but the opportunity hasn’t presented itself yet for us to do so.
Now that I have gone into our history of having only one car, let me go into some highlights I have learned along the way that are very positive and some that are negative, but I want to encourage you that having one car is possible. It just takes some planing.
Benefits of having only one car:
Cost
The cost savings is a HUGE thing with having only one car. We only have to pay gas for one car, insure one car, and pay to maintain one car. That alone is one of the biggest factors that has kept us a one car family is the fact that we save so much money by having only one car. To give you an idea of how much you could save, here is a break down. Now granted we are also in California so some of these numbers will be much different based on where you live.
Cost for gas: $120/month
Insurance: $100/month
Maintenance: $55/for an oil change once a quarter
So on average our cost for our car is under $250 a month. I know that for many people that is just your insurance bill. How does that sound to save money on you bills per month with having only one car? It’s been pretty great for us.
Storage
One other thing that is awesome about having only one car is that fact we can always fit it in our garage. We have a two car garage, but like most people we have stuff in it. No need to fight about which car goes in the garage because you only have one! Hehe. So storing one car is so much easier than two.
Care
If you are one of those people who love taking care of cars, good for you. I don’t have that gene apparently. I am one of those go through the car wash people and vacuum the car out once a month type of person. The great thing is that I only have one car to keep clean, and that works for me.
Maintenance
I know I mentioned the cost maintenance earlier but I am serious about how much you save both in time and money in maintenance for our car. We bought a Toyota so it doesn’t need a lot of maintenance any way, but it still needs to get it’s oil changes and flushes like any car. If we had two cars that would be double the cost and time. There is only one schedule to keep track of and you and your partner are both aware of where the milage is because you both drive the same car.
Drawbacks to having only one car:
Scheduling
This is the hardest part of having only one car. The schedule can be hard. Thankfully I don’t work right now so I am little more flexible so if my husband needs the car it’s not usually a big, but there are times where the schedules clash. Who is going to get the car? Many times I have had to cancel things because my husband needs the car for work and I like his pay check so his work does trump what I am doing. But that happens a lot less than you would think.
Maybe once a month the schedules clash. That really isn’t that big of a deal. So what I had to reschedule something. I end up having the car 95% of the time. I can do that thing later. There is give and take on both ends in order to have this lifestyle work. And it is a lifestyle. Don’t think that it is something you can just wing it and things work out. You need to plan how you are going to spread the car out and who gets it when. If you don’t it could be disastrous.
Time Limits
Since I have to take and pick up my husband from work, I do have my day on a clock. I have to adjust what I am doing to be able to go pick him up when he gets off work. This can be a drawback depending on how my day is going, but there is a way we counter balance the problem at times. My husband has some awesome co-workers who are willing to give him ride home. Find out if this could be an option for you. It could be once in a while or you could set up a regular thing, but ask co-workers if you could get rides from them and then compensate them for their gas.
Final Thoughts
There are so many ways to live with one car. It is something that is possible and there are so many pluses to it. Can everyone do it? Probably not but, if you are willing to get creative, you probably can. Take a look and see if being a one car family can work for you. It has worked for us 🙂